Saturday, July 31, 2010

Green Beans & Corn, a summer dish

while still cooking

This is a good way to utilize the best things of this part of summer: green beans, sweet corn, onions, tomatoes.  Very simple, easy to make for groups, freezable, delicious.

You'll need (for side dishes for 4-6 people):
  • 1 pound green beans (I used a mixture of green and yellow beans because that's what was in my share)
  • half a yellow onion or a few green onions.  Green onions are best (using the whole onion), but I didn't have any
  • sweet corn: you can use one can of corn, a couple ears (boiled briefly then stripped), or one package of frozen (thawed in the microwave or stovetop)
  • a tomato or two
  • 3 tablespoons butter
  • 1-2 teaspoons of paprika
  • 1/2 teaspoon celery salt (optional, especially since I never remember to buy it)
  • salt to taste
The steps:
  • Wash & cut your green beans into nice bite size pieces, I'd say inch segments is good.  Be sure to snap off the stem ends.  I don't care about the little tail ends, but some people don't like those, so feel free to chop off.
  • Chop onion(s) and tomato(es)
  • Melt butter and add veggies and some salt & paprika in a deep skillet on high heat.  Skillet here is easier than a pot 
  • Cook on high heat, constantly stirring until corn is soft and beans are just cooked (there's little I hate more than overcooked veggies, especially green beans)
  • Season as desired.  I like a lot of paprika
  • Serve warm or cold.
I put some of this in the fridge to eat for the coming week and froze the rest in baggies so that I can enjoy these summer delicacies in winter.

Thursday, July 29, 2010

Tuna Bean Salad

I wanted to make a nice summer salad.  This is inspired by a salad we serve at my work.

You'll need (for 4-6 servings):
  • 2 small cans tuna
  • 1 can or half a big jar (think Randall's beans) of mixed beans (cannellini will work too)
  • One bunch fresh chard
  • 1/2 cup mayo
  • 1 tablespoon (ish) red wine vinegar
  • a clove or two garlic
  • 1-2 tablespoons dijon mustard
  • half a yellow onion, diced
  • Some grated parmesan cheese
  • salt and pepper to taste
Chop the chard and onion how you like and simply combine.  If you like olives, add some (chopped) kalamata olives and a bit of their brine (then use less vinegar).  Great plain or on a sandwich.

Friday, July 23, 2010

Super Easy Scones

Blueberry scones closest, chocolate chip scones farther.

I've just been craving scones, so this seemed a good idea.  Easy, pretty quick, and versatile.

You'll need (for 8 good sized scones):
  • 3 cups flour
  • 1/2 cup sugar
  • 5 teaspoons baking powder
  • 1 teaspoon cinnamon (or another nice seasoning, depending upon your add-ins)
  • dash salt
  • 3/4 cups butter (at room temperature)
  • 1 egg
  • 3/4 cup milk
  • 1/4 cup half 'n half (if you don't have half 'n half, just sub milk)
  • something tasty to add.  
The steps:
  • Preheat oven to 400 degrees.
  • Combine dry ingredients
  • Cut in butter using a pastry cutter, fork, hands, or food processor.  Easiest if you cut the butter into smaller pieces before adding.
  • In a measuring cup, beat together egg & milk
  • Make a well in the dry mixture and gradually add egg & milk mixture.  You likely will not use all of the liquid mixture.  Add it little bits at a time, mix in using a fork, and just keep adding until moist.  The consistency should be conducive to rolling out.
  • Add your goodies.  I added blueberries to some and chocolate chips to others.  Cranberries and orange zest is a good choice.  If you want something not so sweet, try dill or cardamom.  
  • You can either roll out the dough and cut it into triangle pieces or just grab it by the handful and shape it into triangles (I chose the latter).
  • Bake on a greased cookie sheet for 15 minutes.
  • Enjoy for breakfast, brunch, mid-morning snack, mid-afternoon snack.

Sunday, July 11, 2010

Raspberry Brownies

Just another recipe to use fresh raspberries.  And I wanted to make something deliciously chocolatey.  Most recipes online use raspberry preserves or mash up and juice their berries.  I wanted something strongly and tartly raspberry, so using whole, fresh berries.

For the brownie batter, you'll need:
  • 1 box of fresh raspberries (washed and dried)
  • 1 cup sugar
  • 1 cup flour
  • 5 eggs
  • 1/2 cup butter (softened nearly to melted)
  • 1 16oz can of chocolate syrup
The steps
  • Preheat the oven to 350.
  • Beat the eggs then combine all ingredients but raspberries
  • Pour this batter into a grease 9x13 pan.
  • Take about 2/3 of your box of raspberries and sprinkle them evenly over the batter in the pan.  Press the raspberries down until they are completely or mostly submerged in the brownie batter.
  • Bake for 35-45 minutes, until it doesn't jiggle.
  • Let cool in the pan.  Avoid the temptation to eat it all.
For the frosting, you'll need:
  • one 8oz brick of cream cheese (softened)
  • 2 cups powdered sugar
  • 2 tablespoons cocoa powder
  • 1 teaspoon almond extract.  (If you don't have almond extract, add some vanilla).
The steps:
  • Combine all ingredients until smooth.  You may want more or less sugar depending upon your taste in cream cheese frosting.  I personally like it not so sweet.  
  • Wait until your brownies cool then spread over the top.  This recipe will yield enough for a thin layer.
  • Use the remaining raspberries as a garnish on top of the frosting.
  • Reward yourself by licking your spatula.


Peanut Broccoli

Another recipe inspired by a similar salad we make at the restaurant I work.  This is an easy way to use up the stalks from your broccoli rather than putting them in the garbage.

You'll need (for enough for 2 people):
  • Stems from one head of broccoli
  • 1/2cup Peanut butter (chunky or smooth)
  • 1 1/2 tablespoons honey
  • 1-2 tablespoons hot water
  • 1 tablespoon rice vinegar
  • 1 1/2-2 tablespoons soy sauce.  If you want to make this gluten free, use gluten free soy sauce (Tamari)
  • 2 tablespoons olive oil
  • 1 tablespoon sesame oil (optional)
  • cayenne pepper to taste
The steps
  • Using a paring knife, peel the broccoli stems (especially the lower parts, away from the head) and chop  off any leaves and the very tough ends of the stalk.
  • Julienne cut the broccoli and place in a tupperware
  • In a separate bowl, place honey, peanut butter, and a little water in the microwave to soften.  Depending on the type of peanut butter you're using, it'll take 20-30 seconds.  The all natural peanut butter takes longer, but is delicious.  
  • Stir these ingredients until it blends smoothly.  I found that the all-natural peanut butter won't really make a smooth sauce, but you're run-of-the-mill Jif type will easily blend.
  • Add vinegar and soy sauce.  If it gets too hard to stir, add a bit of hot water.  You will need to add more water or olive oil to thin it out to the right saucy consistency.
  • Season with cayenne pepper until you like it.
  • Place sauce in same container as broccoli, put a lid on it, and shake until the broccoli is coated.  I found this to be the most effective way of coating the broccoli with the sauce.
Garnish with fresh cilantro, crushed peanuts, or the little ends of the broccoli head.  This is definitely a unique combination, but give it a try and you'll be surprised.

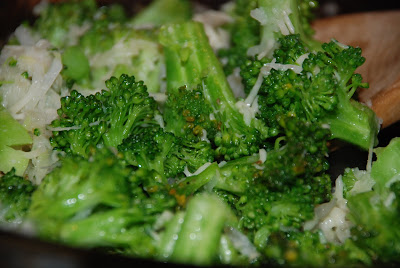
Parmesan Broccoli & Kohlrabi


So, this is a recipe inspired by the grilled broccoli we prepare at the restaurant I work at.  Easy, yummy, freeze-able.

You'll need:
  • One head of broccoli
  • One kohlrabi stem
  • 2-3 cloves of garlic
  • a few tablespoons olive oil
  • salt and pepper to taste.
  • sprinkling of grated Parmesan cheese
The steps:
  • Wash and chop broccoli heads into bite-sized pieces (don't throw away the stems!  See my peanut broccoli recipe)
  • Wash and peel kohlrabi.  Using the coarser side of your cheese grater, grate all the kohlrabi.
  • Chop your garlic cloves into little pieces.  I like this over minced for things like this.  But you can mince it if you'd like.
  • Heat a few tablespoons of olive oil in a pan on the stove.
  • Once the oil is of sizzling temperature, add the broccoli.  Sauté.
  • Once the broccoli is about halfway to done (don't overcook it!), add the kohlrabi and garlic.  You may need to add more olive oil at this point.
  • Add a dash or two of salt and pepper
  • Remove from heat, sprinkle with Parmesan and serve (or save).  

Tuesday, July 6, 2010

Cat Treats

I figure, why pay money for cat treats, when I can make them myself?  Easy peasy!  Modified from a recipe I found to suit what's in my cupboard and my fat cat.

You'll need:
  • 5oz can of tuna
  • 1/4 cup water drained from tuna.  If the water from your can of tuna doesn't equal 1/4 cup, measure out the remainder, rinse the tuna can with it, then use it in the recipe.
  • 1 egg white
  • 1/4 cup oatmeal
  • 1/2 cup flour (you can use whole wheat if you have it, but all purpose is fine too)
The steps:

  • Preheat oven to 350.
  • Mix tuna, water, and egg until combined.
  • Add oatmeal and flour.
  • Drop onto greased cookie sheet by small spoonfuls, keeping in mind that:  
    1. You're cat won't care what it looks like. 
    2. The size of the cookie should reflect the size of its consumer.
  • Bake for 20 minutes.
  • Make your kitty happy.

My cat, Artemisia, is much happier now with her treat--her reward for letting me trim her claws.

Sunday, July 4, 2010

Chocolate Covered Blueberries

So, this is my 4th of July dish, since blueberries, to me at least, feel right for the 4th of July.  And the blue will go with the tomatoes in the quiche I made earlier today.  The white, well, I suppose I will serve them on white dishes.

This will literally take you 10 minutes.  And is delicious.

You'll need: 
I don't have quantities here because you can adjust them depending upon how many people you're serving.  Basically, one bag of chocolate chips should roughly do fine with one box of berries
  • Fresh blueberries (brought to room temperature and dried after being washed)
  • chocolate chips
  • butter or shortening
The steps
  • Melt chocolate chips with a bit of butter or shortening in 15-20 second bursts in the microwave, stirring between each go 'round in the microwave.
  • Before you start assembling your deserts, be sure you have the container for them ready.  I used a flat skinny tupperware.  You may want to line with wax paper for easier cleaning later.
  • Once the chocolate is melty and syrupy and delicious, add the blueberries a handfull at a time. Stir the berries in, gently, until covered with chocolate.
  • Using a spoon and your fingers (best to keep spoon hand clean and only let the other hand get chocolatey), scoop out about 4-6 berries into your container.  Repeat, spacing the clusters just so they won't touch.  
  • When you've used up all your blueberries, use your spoon to scrape the sides of the bowl and drizzle this chocolate on top of your blueberry clusters (it's okay to eat some too).
  • Refrigerate your chocolate blueberry clusters for at least an hour or until the chocolate has formed a hard, delicious shell around the berries.
These are good on their own, with whipped cream, or over ice cream.

Declare your Food Independence and cook/eat locally for your 4th of July celebration!

Quiche

Quiche is one of my new favorites.  A good way to use up spare veggies and cheese that are close to turning or if you have eggs you need to use up in the fridge.  I make the pastry dough myself, which was certainly intimidating until I learned.  Hopefully this explanation will be simple but thorough enough to avoid any intimidation.  Homemade crusts aren't hard once you learn.  And you'll never go back to store bought crusts after that.

If you plan to make this quiche all the way through (from making dough, rolling it, baking, filling, and cooking), there's a lot of wait time, so bake on a day that you have the time and a new magazine just came in the mail or you just bought a new book.

For the quiche crust, you'll need:

  • 3 cups flour
  • touch of salt
  • tablespoon or so Italian seasoning (Yes, I advocate trying your uncooked dough to see if you want to add more seasoning.)  This is a key ingredient and makes the dough oh-so-delicious!  I use the cheapest, most generic blend available
  • 1 cup chilled butter (I use salted, though most recipes you'll find call for unsalted.  This means I use less salt in the rest of the recipe)
  • 1 egg
  • aluminum foil
The steps:
  • In a large bowl, combine flour, salt, and Italian seasoning.  A good indicator that you have enough seasoning is that your mixture will be speckled like a Dalmatian.
  • Cut the butter into small pieces and add to the bowl.  
  • To blend the butter with the flour, it's best to use a pastry blender, but I'm too cheap to buy one, so I use my sturdiest fork and my hands.  You don't want the butter to be totally combined, but rather like little pebbles in the flour, or, at the very best, a coarse meal.  Of course, you don't want to handle the butter too much either and melt it.  I usually go at it with the fork, cutting it in small pieces and combining as best I can.  Then I use my fingertips to pinch the butter into little pieces.  Try to have pieces be of somewhat uniform small size, but it's okay if there are some bigger chunks.
  • In a small bowl, beat the egg with 2 tablespoons cold water.
  • Make a well in the flour mixture and pour in the egg and a couple more tablespoons water
  • Using the fork, gently combine egg and flour, adding more cold water as needed until the mixture holds together.  You don't want the consistency to be sticky like cookie dough, but more like biscuit dough.  Just add water and mix very gradually until it just barely sticks together.
  • Pat this dough into a ball, cover in Saran wrap, and refrigerate for an hour.
  • While the dough is cooling, you could work on the filling.  I'll describe some options below.
  • After that hour is up, clear off a large surface and dust lightly with flour.  Also dust your rolling pin with flour. I usually refrigerate my rolling pin along with the dough for that hour (or at least 15 minutes) to help with sticking.
  • Roll out the dough until it's less than a half inch thick, but not too much thinner than that.  
  • Be conscientious when your rolling of the shape of the pan in which you'll be baking.  I usually bake in a 9 x 13 pan, so it's easy to roll into a rectangle.  This recipe will allow you to fill that 9 x 13 and have leftovers (more on that later).  If you are using pie pans, roll circularly.  This recipe would fill 2 pie pans.
  • Transfer the dough into greased baking pan and trim off any excess.  If you're feeling fancy, you could pinch the top edge of the dough to make it look nice, but it'll be delicious even if you don't.
  • Prick the bottom of the dough several times with a fork.
  • Cover dough with aluminum foil, shiny side down, and place in the freezer for a half hour.
  • After that time is up, bake the crust, with the foil, in a preheated oven at 425 for 8 minutes.
  • Remove the foil and bake until crust looks dull (the butter has soaked in.  Yum!).  About 4 minutes.
  • Remove from oven, reduce heat to 375.  If you are putting cheese in your quiche, sprinkle it on the hot crust now.
For the filling:
  • Basic ingredients all to be blended together: 3 eggs (beaten), 1 pint half 'n half, teaspoon sugar.
  • To this mixture, you can add all sorts of things.  Of course, I love cheese, so put some of that directly on the crust before your add the mixture.  Then just use any veggies you may need to use up.  Because you can't test before the quiche is complete, you'll need to do some sampling just by making quiche every once and awhile and paying attention to what worked and what didn't.  Some veggies work better when cooked before, others are fine if put it raw.  Use your best judgement (or Google someone else's).
  • Some combinations I know are delicious:
    • spinach & feta: before adding, sauté the spinach in olive oil with some minced garlic
    • radishes, leeks & mozzarella: I also used the radish greens and diced up all the veggies nice and small.
    • Turkey & vegetable: roasted turkey chunks, asparagus, whatever other veggies you have.
    • leeks, tomatoes, snow peas, & parmesan: well, I don't know if that's delicious or not.  I'm working on it right now (dough is chilling in the fridge as I type)
  • Once you have your combination settled, whisk the eggs, half 'n half, and sugar together then add your other ingredients.
  • Pour this into the crust
  • Bake 35-40 minutes, until it doesn't jiggle anymore.
  • Let stand for 5-10 minutes before serving.
Other tips/ideas
  • If you don't have all the time or aren't going to serve it right away, a great trick is to prepare the crust and veggies ahead of time.  Then place the veggies in the fully baked crust and freeze (a grocery bag or trash bag, tied off, works fine) until you need it.  When you are ready to bake, let thaw for a few hours, whisk up egg mixture, combine, and bake.  
  • As I said earlier, this recipe will leave you some leftover dough if you use a 9 x 13 pan.  What to do?  you can freeze it and use it in the future for whatever you want.  I've been making mini-quiches.
  • Yes, mini-quiches.  If you want to avoid this weird numbers game of having leftover dough, just make lots of mini-single serving quiches.  This could also allow you to personalize quiches to people's tastes (if you're feeling particularly generous).  Here's how I do it:
    • Grease a ceramic bowl that you plan to bake and eat out of.  I use a bowl I or a friend made, because the shape and size is nice for this.  If you have small, single-serving size glass or corningware, you can use those.  Personally, I think the ceramic bowls are extra nice looking
    • Place the greased bowls in the oven and preheat to 425.  You only need to do this if you're using ceramic bowls which you need to be gentler with in terms of drastic temperature changes.  
    • Once the oven is preheated, remove the bowls and carefully line them with the pastry dough.  Bake pastry dough as directed above, though the times may be shorter.  Difficult to make uniform as everyone's bowls or dishes are different.
    • Once the crusts are done, reduce heat on the oven to 375, remove the bowls, prepare the filling, fill the bowls, and cook.  Again, timing may be different than in a larger pan.
  • You can always make dough, roll it into a ball, and freeze it for later.
  • You have to use real butter for the pastry dough.  Sorry, no margarine here.  Besides, there's like 3 ingredients in butter and how many in your vegetable butter replacement?  I know I know, fat, cholesterol, etc.  Here's my theory: enjoy your food, savor every bite.  Rather than rush through crappy food that may be made with margarine or artificial sweeteners (and what the hell are those made of?), eat slowly and appreciate the flavor of your food.  Relax.  Then you'll eat smaller portions (if you eat slower, you eat less).  
Okay, quiche away!

Ideas?

Have anything you need a recipe for?  Or suggestions for something I should try?  I'm wide open.  Leave a comment or send me a message.

Saturday, July 3, 2010

Fresh Raspberry Vinaigrette

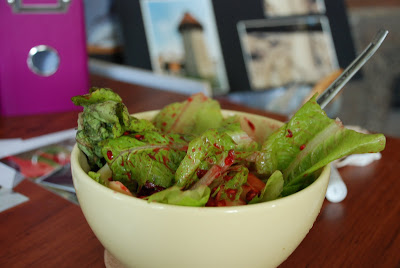
My lunch (delicious!)

I always like to make my own salad dressings because they're healthier, yummier, and less expensive.  In looking to make a raspberry vinaigrette dressing, all the recipes called for raspberry vinegar, but I wanted to use the fresh raspberries I'd just gotten 2 days ago in my CSA share.  So, I improvised this one.  Here's what I figured out.

What you'll need for about 3-4 meal-sized servings (if you're like me and go light on the dressing):
  • one box fresh raspberries
  • 2ish tablespoons olive oil
  • heaping spoonful sugar
  • a few tablespoons red wine vinegar (about a 2:1 ratio vinegar:oil)
  • 1- 1 1/2 tablespoons dijon mustard
  • small clipping of fresh Italian parsley, chopped or pulled apart (like the top 1 1/2 inches of a branch).  If you don't have fresh, use maybe a teaspoon or so of dried.  Maybe more.  Taste and figure it out.
  • salt to taste
  • lemon juice (I didn't add any because I don't have any, but I think it'd be delicious!)
The steps:
  • Mash the raspberries as best you can in a bowl using a spoon or a fork.  If you have a food processor or blender (of which, I have neither), use that.  Then you can strain this mixture through a mesh screen to get rid of the seeds.
  • Add sugar, oil, vinegar, and mustard.  Do all of these gradually, especially the mustard, as it's easy to over do.  You may want more mustard because you like a stronger Dijon flavor.  I like it mild, so I didn't use too much.  Ending consistency should be a thick sauce, kinda resembling French dressing.
  • Season with parsley, salt, and lemon juice until delicious.

I served this over just a simple green salad with chopped apples and Parmesan cheese.  Would be great with some cottage cheese (but mine had little green colonies in it!).  Grilled chicken on the salad would make a complete, filling meal!


Exciting purchase of the day: mini herb garden.
I went to the farmers' market this morning to pick up a few things, especially on the hunt for some fresh herbs.  I found a little pot that had in it parsley, cilantro, and basil.  Just perfect!!  It has a place of pride in my kitchen now.  Hopefully, I can foster these plants enough so that they'll outgrow that pot and I'll need three pots.  Save so much money!