Apologies for not posting this week. It's been a busy week. This Saturday I leave for 2 weeks in Istanbul, Turkey & Famagusta, Cyprus (well, Turkish Republic of Northern Cyprus). I hope to eat a lot of great food and buy some wonderful spices at the spice bazaar in Istanbul. Be on the lookout for some posts in a few weeks about delicious Turkish & Cypriot food!
Wednesday, June 27, 2012
Monday, June 18, 2012
Nigiri Sushi
Today's Ghost Writer: Jeff (Ellis's boyfriend)
Nigiri style sushi, or Nigirizushi, is a style of sushi in which fish (or the main topping of your choice) is draped directly over a small palmful of rice. The Japanese name translates roughly to "hand formed sushi". Nigiri is a simple dish to make, using only a few ingredients and taking only a few minutes to prepare, yet is something of an art form unto its self which can take years to master.
 |
| Some Nigiri pieces made with Salmon. |
- Your choice of fish (~1/3 pound)
- 1 cup short grain rice
- 2 tbsp rice vinegar
- 1 tsp salt
- A very sharp non-serrated knife
And you may want:
- Soy Sauce
- Wasabi
- Sesame Seeds
- To keep your cats out of the kitchen
Choosing Fish
Sushi is made with raw fish, so there are a few things to keep in mind when choosing fish. Your best bet is to purchase fish that has been frozen and not yet thawed. If you are visiting a fish market or your grocery store, ask the clerk if they have any in the back that has not been unfrozen yet. Frozen fish keeps better and the freezing process kills any parasites that may be present, so make sure your fish is frozen. Many kinds of fish can be used, but Tuna and Salmon are easy to find and are easier to work with, so I would recommend one or both of those.
Set your fish out to thaw about a couple of hours before you plan to eat, more if the piece is thicker than about 3 cm.
Making Rice
Sushi rice must be sticky, or your Nigiri pieces are not going to hold together and your sushi experience will be very sad indeed. Your first step is going to be making the rice, which you will need to start about half an hour before you plan to eat.
- Thoroughly rinse the rice in a mesh strainer for about a minute, under a cold water tap. This helps remove extra starches and will prevent the rice from becoming too glutenous.
- Add the rice with an equal part of water into a small covered pot, on high heat.
- Once the water is boiling, reduce the heat to a slow simmer for about 15 minutes. Remove heat and let cool about 10 minutes while covered.
- Mix the vinegar and salt in a small bowl, and stir until the salt has dissolved.
- Pour the vinegar mixture onto the rice, and gently fold the rice with a large spoon until it is mixed in. Do not use a stirring motion or be too vigorous - the rice will have already started to clump together and we don't want to break it up too much. Add a few tablespoons of sesame seeds to the rice, if that's your thing.
- Allow the rice to cool to body temperature, uncovered.
Cutting Fish
You're going to be cutting thin slices of fish from a larger block, and pairing each slice with a small ball of rice. Place your thawed fish on a cutting board and ready your insanely sharp knife. Seriously, sharp.
 |
| Fish pieces should be a few centimeters thick, and have a nice color. Salmon is shown here in the foreground. |
Cut off pieces about 1/2 cm thick, and about 8 cm by 4 cm wide. The size requirements are loose; the most important thing is to get a thin slice that will drape nicely over the rice and hold together. Cut against the grain of the fish and at a diagonal angle, this will give your pieces a pleasing striped appearance. In the photo above, one would cut a line starting in the upper left and moving to the lower right, at a right angle to the stripes in the meat.
Try to use a single slicing motion - do not saw back and forth or apply much pressure. If the fish is not cutting easily then it is likely the knife is not sharp enough. While you're still learning I'd recommend going back and forth between cutting the fish and assembly, in case you need to make adjustments.
Assembly
Wet your hands lightly in a small bowl of cold water; this keeps the rice from sticking to your hands. Grab a small palmful of rice, about the size you think you could eat comfortably in a large bite. Form it with your fingers into an oblong and roughly rectangular blob, pressing firmly against your palm. If the rice is sticking to your hand more than to its self, try wetting your hands more.
Keeping the rice ball in one hand, pick up a slice of fish with the other. Lay the fish gently on top of the rice ball, then press it gently with two fingers to help it adhere to the rice. Form the rice a bit more if necessary so that the piece looks clean and symmetrical. Looking directly from the top down the rice should not be visible underneath the fish.
If you like wasabi, place a very small dab of it underneath the fish before laying it on the rice. Soy sauces can be brushed atop the finished Nigiri pieces or used as a side for dipping during the meal.
And you're done! Enjoy your sushi soon - it does not keep or refrigerate well.
And don't cut yourself with that knife of yours.
Summer Dinner
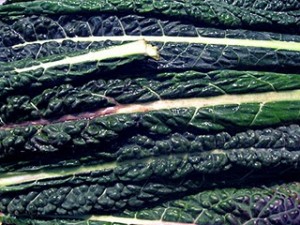
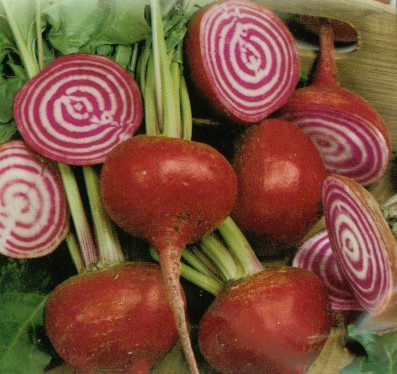
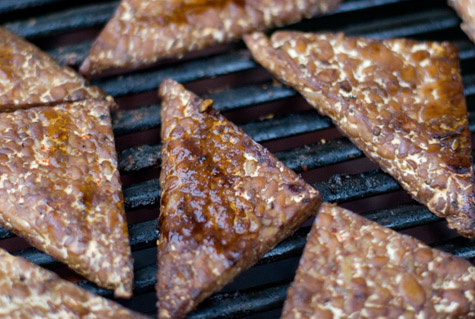
Just thought I'd share some photos of the delicious dinner I made tonight. It consisted of steamed artichoke with spicy dipping sauce (recipe below), grilled golden beets with a balsamic reduction, kale with tahini sauce, maple marinaded tempeh, and a few slices of fresh baguette from the farmers' market (I swear I'll start making my own soon). Fresh, delicious, seasonal. A few things:
- The zesty dipping sauce I used for the artichoke leaves/petals** was:
- 2 T vegan mayo
- 1 T Sriracha
- 1/2 T dijon mustard
- 1 t curry powder
- I used golden beets in my grilled beets recipe. These were even sweeter than the candy stripe variety. I also reduced the balsamic marinade quickly on the stove while the beets were grilling on the cast iron. Ended up with a sticky, sweet balsamic reduction that was to die for
- Based on a suggestion from Jeff, I cut out the water from the tahini sauce for kale. Ended up with a thicker, more strongly flavored sauce, but I think I like thinner better. The more delicate flower allows the kale to shine through.
I think the only thing that would have made this meal better would have been some grilled tomatoes. Otherwise, this was just about perfect. With some local blueberries for dessert. Heaven indeed. Enjoy the photos below (I also just got a new, tabletop tripod so I'm having a lot of fun taking photos). Click to enlarge.
 |
| my plate. From top left: baguette, tempeh, kale, beets |
 |
| artichoke and dipping sauces, our plates, bowl for artichoke leaves |
 |
| perfect |
**Are the green parts you eat from an artichoke more technically leaves or petals?
Coming soon: I've asked Jeff to contribute his sushi expertise as a guest contributor. He is hesitant to do so though I think he is doing a lovely job of making himself sushi for lunch (and dinners when I'm not home). I took photos the other day when he made it, so we will see if we get anything posted about that.
Monday, June 11, 2012
fresh vegan taco salad

Taco salads are usually such a throwaway item. I've been making them at home lately (mostly because I get a lot of lettuce in my CSA) and they are so much better than what you get in a restaurant! I suppose the difference is that I use fresh, high quality, local ingredients instead of sad, bagged iceberg lettuce. So, here goes...
For 2 huge salads, you'll need:
- 2-3 large handfulls of tortilla chips, crushed in your hands into smaller pieces
- 1 small head of red leaf lettuce
- ~10 cherry or grape tomatoes, halved (I've been buying the mini heirloom tomato boxes at Trader Joe's or tomatoes from the farmers' market since we aren't getting them in the CSA yet)
- 1 purple kohlrabi, washed, peeled, and put through the grater attachment on your food processor
- 1 ear of corn, cut off the cob, and quickly sauteed in vegetable oil
- 1 yellow pepper, half sliced, half diced
- 1 small can of black beans, drained & heated
- 1 avocado, sliced (optional)
- 6 oz cooked beefless ground beef seasoned with:
- 1/4 t chili powder
- 1/4 t cumin
- 1/2 t cayenne pepper
- dash salt
- 1/4 t paprika
- 1/4 t oregano
- cilantro lime dressing made with:
- juice of 1 lime
- 2 cloves of garlic, peeled
- salt & pepper to taste
- 1 T balsamic
- 3 T olive oil
- 1 T vegan mayonaise
- small bunch cilantro leaves (about 1 handfull)
- 1/2 t bijol seasoning
The steps:
- Prepare 1st seven ingredients and arrange on your plate with tortilla chips forming the bed
- Cook the beefless ground beef in a skillet with the spices listed above. If you're not vegan, use real beef, I suppose. I've also used beefless beef strips and seasoned them similarly.
- For the dressing, combine all ingredients in a food processor or blender and pour over top.
Enjoy this with an ice cold beer. Jeff & I ran a 5k yesterday and it was close to 100 degrees. In short, we were starving by the time we got home (even after the free pizza and beer). We wolfed these salads down.
Sunday, June 10, 2012
kale with tahini sauce
Wow, this has become one of our favorite things to eat. We get a lot of kale in our CSA and were looking for a really delicious way to eat it. This works great and is easy. The tahini sauce is good on a lot of veggies, but I think kale's nuttiness makes it the best candidate.
For 4 servings, you'll need:
- 1 bunch fresh dinosaur kale (you can use other kinds of kale, but I like this best)
- 1/4 c lemon juice
- 1/2 c flavorful olive oil
- 1/4 c liquid aminos
- 1/3 c tahini
- 1 T onion*
- 1 garlic clove, peeled*
- 1 T real maple syrup
- 1/4 c water
*If you have garlic scapes you need to use up, replace onions and garlic in this recipe with 2-3 stalks.
The steps:
- Roughly chop your kale, removing the rigid ribs.
- Place it in a steamer and let cook while you prepare the sauce
- In a food processor, combine the rest of the ingredients until smooth
- Once the kale is done (don't overcook it, just soften it a little), remove from steamer, place in a serving bowl, and pour sauce over top
- Let stand 5-10min to let the sauce soak in
- Enjoy it.
- I'd recommend serving this with some bread because you'll want to soak up all of this yummy sauce
easy pizza dough
I make pizza a lot. I was buying pizza dough and then realized that was dumb because homemade is easy and cheap. Here is how I make it:
For one pizza (12inches, ish), you'll need:
For one pizza (12inches, ish), you'll need:
- 1 package yeast
- 1 t sugar
- water
- 1 t salt
- 2 1/2 c flour
- 2 T flavorful olive oil
- cornmeal
The steps:
- Dissolve yeast and sugar in 1 cup of warm water.
- Let stand 10 minutes, until creamy
- Stir in salt and flour. Then, add olive oil.
- Combine until smooth
- Let rest a minimum of 5 minutes
- Preheat your oven to 450
- Spread out your pizza dough on a lightly greased cookie sheet, lightly dusted with cornmeal
- Add your toppings and backe 15-20min
You can also use this recipe to make pizza bread that is delicious dipped in olive oil. To do so, after everything is combined, knead the dough for a few minutes. Place the dough in a greased baking dish (I like to use a square corningware) and let rise 30-45 min. Top with salt and crushed red pepper and bake in a 450 oven for 15-20 min.
For toppings, some of my favorites are:
- caramelized onions
- small chunks of tofu I've marinaded in balsamic and garlic
- fresh basil
- sauteed mushrooms
- sliced tomatoes
Saturday, June 9, 2012
super easy thumbprint cookies

This is my new favorite cookie recipe. It's so flipping easy and customizable. Also makes a good basic shortbread that you can use for a lot of things (pie crust, etc). Here goes:
For 1 1/2-2 dozen cookies, you'll need:
- 1 c vegan margarine (earth balance), softened (not melted)
- 1/2 c raw sugar
- 1/2 t vanilla
- 2 c flour
- some sort of filling*
The steps:
- Preheat your oven to 350
- Cream margarine, sugar, and vanilla until light
- Add flour 1/4 cup at a time. Start by mixing with a spoon and then use your hands. You may not need all 2 cups. 1 3/4 is sometimes enough. Final texture should be like play-doh
- Roll dough into 1-1/2" balls and place onto a lightly greased cookie sheet
- Press into dough balls with your thumb to make room for your filling
- Spoon out filling (about 1/2T for each cookie)
- Bake 12-15 minutes. Cookies will not turn golden brown unless they are burnt, so take them out when the outsides feel stiff
- Promptly, but carefully, remove from cookie sheet and let cool at least 5 minutes before eating
*For filling, you have many options. Here are some good ones:
- jam (one with a strong flavor like strawberry rhubarb is very good here)
- apple butter
- a simple chocolate sauce (margarine, vanilla, cocoa, sugar, and a little flour)
- mashed bananas (a good use of ones that are too ripe)
- nuts & agave (or honey)
- dark chocolate pieces
These cookies will make me fat because they're too easy to make.
grilled candy striped beets
I got these delicious heirloom candy striped beets in my CSA this year. A friend of mine who gets the same CSA suggested grilling them. I don't have a grill but did this in my oven and using my cast iron skillet. Beets are a borderline vegetable for both my boyfriend and me. These ended up sweet, earthy, and yummy. I would recommend trying these if you don't think you like them.
For 2 large servings, you'll need:
For 2 large servings, you'll need:
- 3-4 small-medium beets
- 1/3C balsamic vinegar
- 1t rosemary
- 1 clove garlic, crushed & chopped
- 1/2t herbes de provence
The steps:
- Wash and peel beets. Cut into discs, about a 1/4 inch thick.
- Combine marinade ingredients and add beet slices
- Marinate at least 30 minutes, stirring occasionally to ensure even coverage
- When you're ready to cook, preheat your oven to 425*
- Place beets in a 9x13 baking pan. Spread out so only one layer
- Cover the pan in foil and bake
- Bake for 15-20min, or until fork tender
- During the last few minutes of baking, preheat your cast iron skillet (one like this)
- Remove beets from the oven and cook them 2-4 minutes on each side in your skillet over med-high heat
- Serve with rice or other roasted veggies or tempeh (like this)
*If you would like to grill these, rather than cooking them in the oven, you can wrap the beets in foil and cook on the grill 15-20 min, until fork tender. Then, remove from the foil and grill for a few minutes.
easy tempeh marinades
Tempeh is a recent love of mine. Much more flavorful than tofu and a bit easier to digest. Gets a really yummy grilled meat-ish flavor when you grill it or prepare in the cast iron. Below are two similar but delicious marinades for your tempeh.
For two servings, you'll need:
MAPLE TEMPEH MARINADE
- 3T soy sauce or liquid aminos
- 3T real maple syrup
- 1t rice vinegar
- 2 cloves garlic, crushed & chopped*
- 1/2-1t cayenne pepper
- 1 package of tempeh
SWEET BERBERE TEMPEH MARINADE
- 3T lemon juice
- 3T amber agave (if vegan) or honey
- 1t salt
- 2 cloves garlic, crushed & chopped*
- 2t berbere
- 1 package of tempeh
*You can sub about 2T of minced garlic scapes for garlic cloves if you have them. Will create a more onion-y, less garlic-y flavor. Also a good way to use them if you get them in your CSA.
The steps:
- Slice your tempeh long ways (like a hot dog bun) to make thinner then slice into triangles
- Combine above marinade ingredients.
- Place tempeh and marinate ingredients in a shallow rectangular tupperware and marinade for at least 30min. Shake the tupperware occasionally to ensure even coverage
- When you're ready to eat, heat up your cast iron skillet for a few minutes on high. My skillet has ridges so it simulates grilling (it looks like this and I love it! http://dsp.imageg.net/graphics/product_images/pDSP1-7328065dt.jpg).
- Once the skillet is hot, turn heat to medium and carefully place tempeh in the pan
- Cook 3-5 minutes on each side, or until golden brown
- Serve and poor any leftover marinade over top.
- Enjoy!
I like to eat this with roasted veggies. Yum!
Redux
I'm bringing back the blog! This past year has been a whirlwind (yeah, it's been more than a year since I posted! Jeez!). I moved to Philadelphia last August to start grad school and my boyfriend and I moved in together and life has been a rollercoaster, but in a really, really good way. So, that's my justification for not posting at all. So, are you ready? I'm gonna add a lot of new recipes machine gun style over the next few days. Here goes...

Subscribe to:
Posts (Atom)